Android Drag and Drop
Although Android system has a very good built-in drag & drop mechanism, I seeing lots of libraries that just duplicate this behaviour, or users that hack they way for building drag & drop on their apps. In this blog post I will explain how to implement a simple drag & drop functionality between different views with a very small amount of code.
0. Setup
For our example we gonna build a simple 3x3 grid with a numbers from 1 to 9. Than the user will be able to drag and drop between those numbers and the result will be the multiplication of this 2 values on the dropped view.
So first, let build our view with the numbers:
[code language=“xml”]
<TextView
    android:id="@+id/text1"
    android:layout_width="wrap_content"
    android:layout_height="wrap_content"
    android:text="1"
    android:textSize="40sp"
    android:layout_gravity="left|top" />

<TextView
    android:id="@+id/text2"
    android:layout_width="wrap_content"
    android:layout_height="wrap_content"
    android:text="2"
    android:textSize="40sp"
    android:layout_gravity="center_horizontal|top" />

<TextView
    android:id="@+id/text3"
    android:layout_width="wrap_content"
    android:layout_height="wrap_content"
    android:text="3"
    android:textSize="40sp"
    android:layout_gravity="right|top" />

<TextView
    android:id="@+id/text4"
    android:layout_width="wrap_content"
    android:layout_height="wrap_content"
    android:text="4"
    android:textSize="40sp"
    android:layout_gravity="left|center_vertical" />

<TextView
    android:id="@+id/text5"
    android:layout_width="wrap_content"
    android:layout_height="wrap_content"
    android:text="5"
    android:textSize="40sp"
    android:layout_gravity="center" />

<TextView
    android:id="@+id/text6"
    android:layout_width="wrap_content"
    android:layout_height="wrap_content"
    android:text="6"
    android:textSize="40sp"
    android:layout_gravity="right|center_vertical" />

<TextView
    android:id="@+id/text7"
    android:layout_width="wrap_content"
    android:layout_height="wrap_content"
    android:text="7"
    android:textSize="40sp"
    android:layout_gravity="left|bottom" />

<TextView
    android:id="@+id/text8"
    android:layout_width="wrap_content"
    android:layout_height="wrap_content"
    android:text="8"
    android:textSize="40sp"
    android:layout_gravity="center_horizontal|bottom" />

<TextView
    android:id="@+id/text9"
    android:layout_width="wrap_content"
    android:layout_height="wrap_content"
    android:text="9"
    android:textSize="40sp"
    android:layout_gravity="right|bottom" />
[/code]
1. Dragging
We’ll setup each view to be draggable on long click:
[code language=“java”] view.setOnLongClickListener(new View.OnLongClickListener() { @Override public boolean onLongClick(View v) { ClipData data = ClipData.newPlainText(“value”, view.getText()); view.startDrag(data, new View.DragShadowBuilder(v), null, 0); return true; } }); } [/code]
Couple of things to pay attention:
We should pass the data of the view value to the drag and drop event for later use (to calculate the multiplication), we’re doing it by using ClipData.
We should show some indication about the dragging- that’s what the DragShadowBuilder for, by default he’s drawing the view image on dragging position. You can use it for drawing another image or some other indication.
When we’re ready we call startDrag. Yap, that’s simple.
2. Dropping
Now for the other side of the Drag&Drop- the drop. Again, we’ll setup each view with a drag listener:
[code language=“java”] view.setOnDragListener(new View.OnDragListener() { @Override public boolean onDrag(View v, DragEvent event) { switch(event.getAction()) { case DragEvent.ACTION_DRAG_STARTED: return true;
                case DragEvent.ACTION_DRAG_ENTERED:
                    v.setBackgroundColor(Color.LTGRAY);
                    return true;

                case DragEvent.ACTION_DRAG_LOCATION:
                    return true;

                case DragEvent.ACTION_DRAG_EXITED:
                    v.setBackgroundColor(Color.TRANSPARENT);
                    return true;

                case DragEvent.ACTION_DROP:
                    v.setBackgroundColor(Color.TRANSPARENT);
                    int dragVal = Integer.parseInt(event.getClipData().getItemAt(0).getText().toString());
                    int viewVal = Integer.parseInt(((TextView) v).getText().toString());
                    ((TextView) v).setText("" + (dragVal + viewVal));
                    return true;

                case DragEvent.ACTION_DRAG_ENDED:
                    return true;

                default:
                    break;
            }
            return false;
        }
    });
[/code]
OMG THAT’S SO MUCH CODE! AND WITH A SWITCH CASE!! YOU PROMISE IT SHOULD BE SIMPLE!!! Ok ok, please calm down, take a glass of bear and sit down. Actually the drag handling is pretty simple there just a bit of boilerplate code (cause you know, java…)
Lets’s go over all the actions in the drag event we should handle (remember, this listener is on the dropped view and all those actions related to this view, please don’t confused between the dragged view and the dropped view):
ACTION_DRAG_STARTED- that’s mean that there is some other view in the screen that is start dragging. If we want this other view will be able to be dropped on our view we should return “true”, if we’ll return “false” all the dragging and dropping flow won’t be relevant (and the related events won’t be delivered).
ACTION_DRAG_ENTERED- the dragged view was entered to our view area, usually we should show some indication here (like changing the background color on our case)
ACTION_DRAG_LOCATION- that’s mean that the dragging view is changing his location within our view area, not much to do here, so just ignore.
ACTION_DRAG_EXITED- the dragged view was exited from our view area, again- indication should be show here.
ACTION_DROP- an actual drop was committed on our view! Now’s the time to do your logic (for our case putting the right value in the text box). Don’t forget to reset your indication from the ACTION_DRAG_ENTERED event!
ACTION_DRAG_ENDED- the drag and drop flow was ended, but not on our view ( =( ). Again, not relevant on our case so we just ignore.
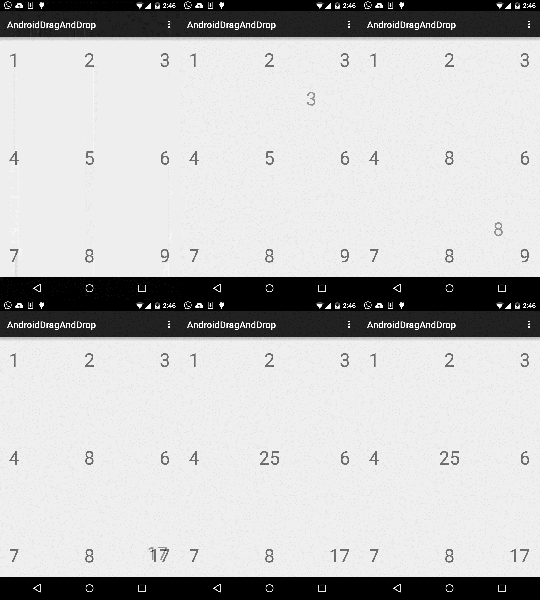
Pretty simple right? This is how this should look like:
You can also find the full project source code in my github
_Credit for cover image: http://genius.com/1699408/Major-lazer-bubble-butt/I-aint-snoop-dogg-but-imma-drop-it-like-its-hot_
